The original moldings along the windshield, roof and doors have a black coating that wears off with time. Even though the moldings are chrome underneath, they end up looking ratty. Fresh moldings give the car a very nice facelift. I replaced all the exterior body moldings on my 1992 300ZX Twin Turbo with new, OEM pieces, with the exception of the quarter panel glass. These included the long pieces on the sides of the windshield, the two short little roof pieces behind the T-tops that are just a few inches long, the long door pieces that sit on the outside edge where the glass goes in and out of the door, and the T-top pieces.
For the rear side quarter panel glass, I used moldings made by KurumaZ. This piece of molding is not sold separately by Nissan, the entire glass has to be ordered. Therefore, there is no part number for just the molding to the side quarter panel glass.
KurumaZ provides an aftermarket kit that includes the molding pieces to the side quarter panel glass and the door moldings, only. So if you purchase the KurumaZ kit, you will not need the door moldings listed below.
Some folks have removed their moldings so they could repaint them black with various types of coatings, and then reinstall them. Please see the very last section for a suggestion on the product I would use to respray the moldings, but I recommend replacement over trying to strip and paint old moldings.
The overall job is not hard if you take your time. Each type of molding attaches to the Z in a different way.
RH = passenger side, LH = driver side
Here are the part numbers for the coupe or 2 seater:
windshield molding RH 72760-30P00
windshield molding LH 72761-30P00
roof molding RH (short piece) 73852-30P00
roof molding LH (short piece) 73853-30P00
door molding RH 80820-30P01
door molding LH 80821-30P01
T-top molding RH 91784-30P20
T-top molding LH 91875-30P20
molding clip 73856-30P10
The molding clips are needed for the roof pieces, and are the same as the top most clips on the windshield molding. Get 6 clips. They're only a buck each and the old ones will be brittle. Slicktops need ten clips, buy a couple of extras.
For slick-top moldings see the separate section below with pics.
For 2+2's (z32's with a small back seat) here are the part numbers:
windshield molding RH 72760-30P00
windshield molding LH 72761-30P00
roof molding RH 73852-32P00
roof molding LH 73853-32P00
T-top molding RH 91784-32P20
T-top molding LH 91785-32P20
The price for everything is around $350. I bought mine from Coz at Concept Z.
Courtesy Nissan also sells all the molding pieces as a "kit."
KurumaZ sells an aftermarket molding kit for the side quarter panel glass and the doors.
You can spell it molding or moulding, and in fact Nissan spells it both ways.
WINDSHIELD MOLDING
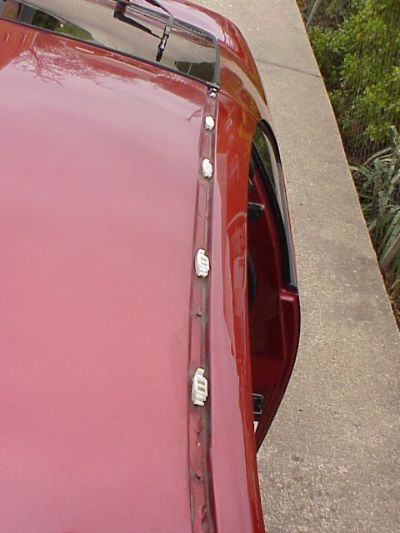
For the long moldings on the sides of the windshield, there are several, evenly spaced clips that are part of the underside of the molding that attach to the car. The clips came already attached to the new molding, except for the top-most clip nearest the T-top, which was attached to the body of the car.
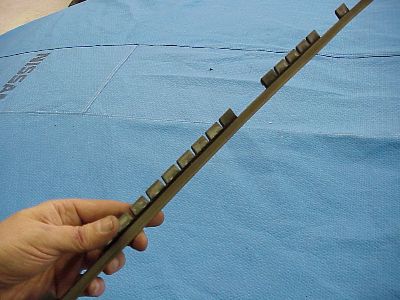
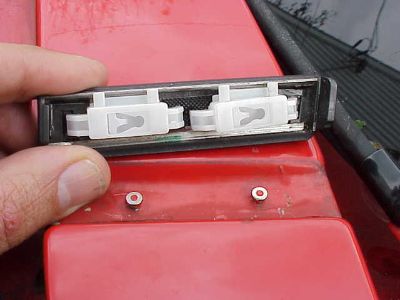
The first photo shows the underside of the end of the new windshield molding that went under the hood of the car. There is one black clip as shown, then four white clips that are evenly spaced along the molding. The black clip hooks the edge of the windshield glass. The white clips go into the plastic molding fastener shown below.
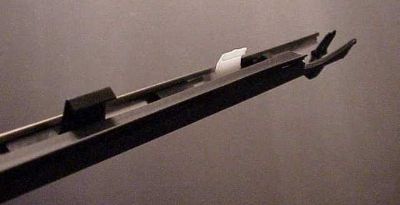 The new molding pieces came with 4-5 of these hook clips already in place. The new molding pieces came with 4-5 of these hook clips already in place.
Same white hook above in my hand.
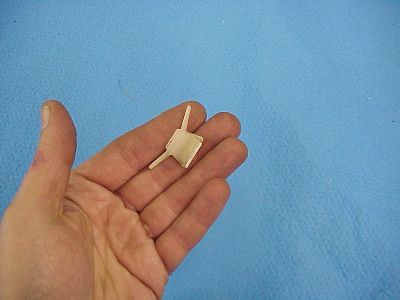 These windshield molding clips can be purchased separately,part number NIS300-72796-30P00, but they come already attached to the new molding. These windshield molding clips can be purchased separately,part number NIS300-72796-30P00, but they come already attached to the new molding.
I have seen the above clips on Amazon.com for a buck a piece in packs of fifteen.
 This rubber gasket strip also came pre-installed in the new molding, but it slides out easily. This rubber gasket strip also came pre-installed in the new molding, but it slides out easily.
You can and should buy pry tools to remove the molding and other trim fasteners around the car. These protect your car better than a butter knife or padded screwdriver.
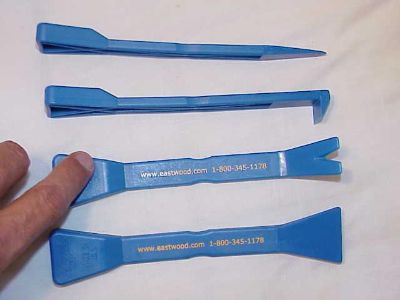 Little hard to read the adverstisement on the handles but this set is the Reinforced Nylon Pry Tool Set from Eastwood. Little hard to read the adverstisement on the handles but this set is the Reinforced Nylon Pry Tool Set from Eastwood.
Harbor Freight also sells them for cheaper.
If you don't have the above tools, you can use your fingers and a screwdriver padded with a rag to carefully pry the pieces off. Don't crack your windshield. It's been done.
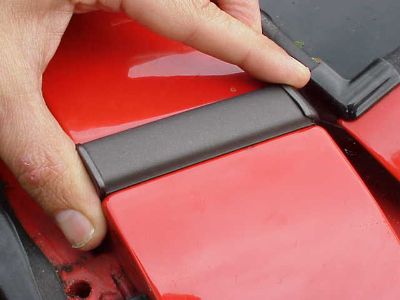
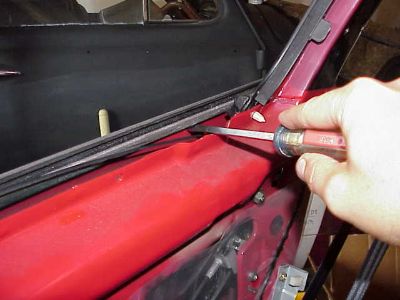
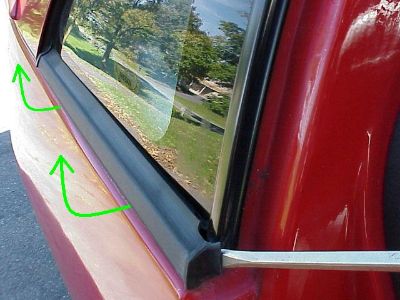
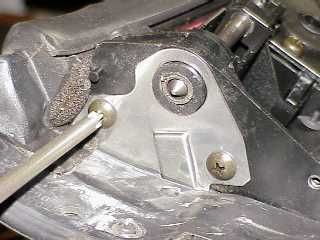
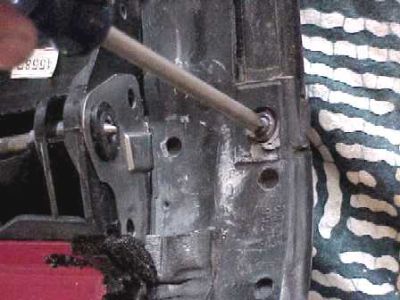
Open the hood. First see if you can slide the molding along its channel a few inches toward the T-tops. Both of mine slid easily. This caused the molding to pop free from the top most clip. These top clips stayed attached to my car on both sides. The passenger side clip is shown in the photo below, with the old molding already removed, the front of the car was to the right of the pic. Pry the molding off of this clip first.
 This is the clip molding, part number 73856-30P10. This is the clip molding, part number 73856-30P10.
These clips are the same style of white clip used for the short roof pieces, behind the T-tops. I reused the old clips for the windshield molding since these clips never came off the body of the car.
Once you have the molding free from this top clip, the rest of the molding length is simply pried free. The remaining clips are attached on the outboard side of the molding strip, closer to the body pillar than the windshield glass. There are four of them, buried into a plastic channel groove the service manual called the "molding fastener."
The trick to removing the molding without bending or crimping it, is to only pry at the points where the fasteners are attached. You do this by "feel." If you pry too far from the fasteners, you will leverage the attachment point and bend the molding. Since I was replacing the molding, I didn't care if I trashed the old ones. If any old, broken molding clips snap off in the plastic channel "molding fastener," you can snake them out with a thin edge by sliding the broken pieces to one edge of the molding fastener. New clips came already attached to the new molding.
When I removed the passenger side molding, the plastic molding fastener also pulled loose from the car, so that had to be repaired as well.
The service manual listed using a heat gun and double sided tape to replace and repair it. Instead, I bought a two-part epoxy and glued the fastener back in place, solid as a rock. The next photo shows the molding fastener glued and held into place with cardboard wedged between it and the windshield. Do not glue the fastener to the windshield, glue it to the car body.
The temperature was very cold in the garage, so I let it sit for over 24 hours. The molding fastener pulling out seemed like a fairly common occurrence to me, so be prepared to save and fix it. I do not know if the plastic molding fastener can be bought separately but I was unable to locate a part number for it.
I should mention that I started this project in the winter, in a garage that was below freezing. After going through what I did, I learned why pros do not do this kind of work in the cold. I waited until the summer to finish the job. If you try and work in a cold environs, the plastic and rubber is too stiff and brittle. Wait until it's nice and warm outside, or at least until you have a heated garage, lolam.
Once the old molding is out it's simply a matter of positioning the new molding and pressing it down into the plastic channel groove. There is a little rubber bumper stop attached to the end of all the windshield moldings. This rubber bumper stop goes under the front fender first. Putting a little silicone on this rubber bumper stop helps with the wiggle room.
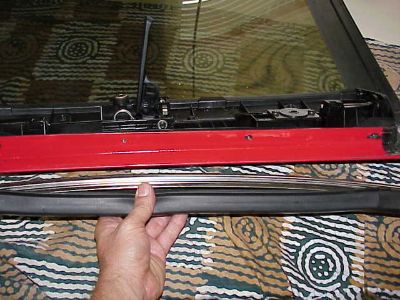
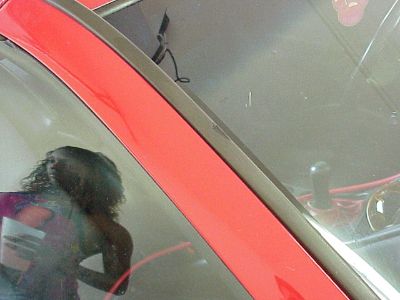
This pic below is looking across the windshield and cowling at the windshield molding already installed.
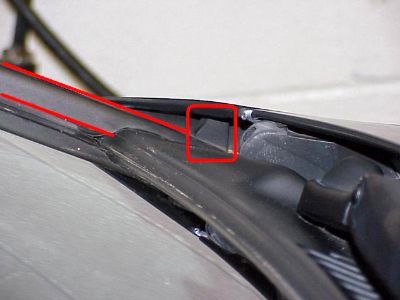 The rubber bumper stop in the red square came attached to the end of the molding, and was wedged under the passenger fender before the rest of the molding was snapped into place. The rubber bumper stop in the red square came attached to the end of the molding, and was wedged under the passenger fender before the rest of the molding was snapped into place.
Each clip should give a distinct, satisfying snap once it is seated in place. The white clips will snap anywhere inside the groove of the molding fastener. The black clip hooked under the windshield glass. I ran a trickle of silicone spray into the groove of the molding fastener because the garage was so cold. The molding also snapped into place over the top-most, white, rectangular molding clip that was still mounted to the body.
There is somewhat of a "spongy" feel to the molding after it is installed when you press down on it, because of the soft weather stripping on the side of the molding that was in contact with the glass. This is normal, as I have compared it to many other OEM molding pieces that have never been changed out.
If you're taking off your windshield moldings to paint them, and not replace them, then you have to be sure to not damage them. If you're nervous or hesitant about this, then stop by any windshield repair shop. They are experts at removing and replacing windshield moldings.
ROOF MOLDING (short pieces)
I thought the windshield molding would be harder than the roof pieces, but I spent much more time on the short little roof pieces. Remove the T-tops and open your rear hatch for access. Two white clips hold each piece onto the roof, and each clip slides and locks over a metal nipple that is part of the body of the car.
You should have ordered a handful of these white clips. I did not want to get into the middle of a job and then be held up because I broke a one-dollar clip.
Study the clips closely on and off the car so you understand how they work. Once you see how they attach, you should be able to slide and lift off your old roof moldings.
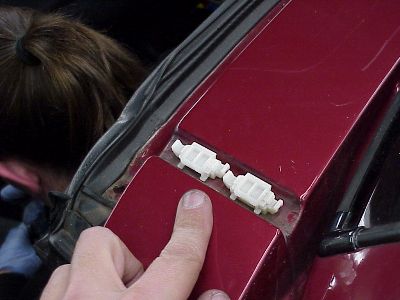
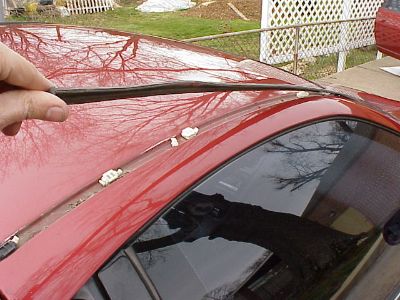
My roof moldings slid toward the rear of the car to come off. Just tap lightly and see which direction they want to go. I wasn't worried about preserving any old parts since I had all new replacements, so I could afford to hack a bit. After you remove your old molding, your roof should look like the photo below before the new moldings are installed.
 The clips have a front and a back. You will also notice that they have a ratchet, sliding mechanism to them for lateral adjustment. Start with them "centered," more or less. The clips have a front and a back. You will also notice that they have a ratchet, sliding mechanism to them for lateral adjustment. Start with them "centered," more or less.
If one ratchets too far, just push it all the way through until the clip comes apart into two pieces and then reassemble it. Weird.
For the new pieces, the preferred method is to mount the white clips onto roof first, then snap the short T-top molding pieces into place. For some reason, on my car if I put the clips on first, I could not get the black molding piece to snap into place no matter how hard I pressed. On other cars I have done, putting the clips on the roof first, worked.
So for my car I snapped the clips into the molding, then slid the entire molding piece into place. This made lining up the molding piece a little tricky. There really isn't a lot of room for error since the clips take up most of the available space on the underside of the molding, but this mounting method is a little trickier than putting the clips on the roof, THEN the molding.
Make sure you have the clips oriented so they both need to slide in the same direction to lock once mounted, otherwise, DOH! I installed mine such that the molding piece slid forward to lock. Installing the first one took me an hour of trial and error, and five minutes to do the second one.
On other cars, the easier way was to put the clips on the roof first, then snap the molding directly into place, as shown below.
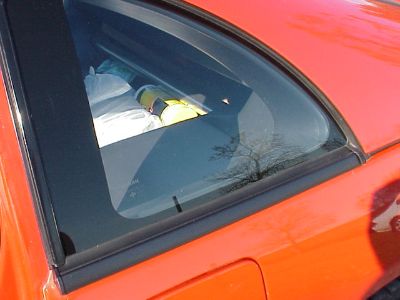
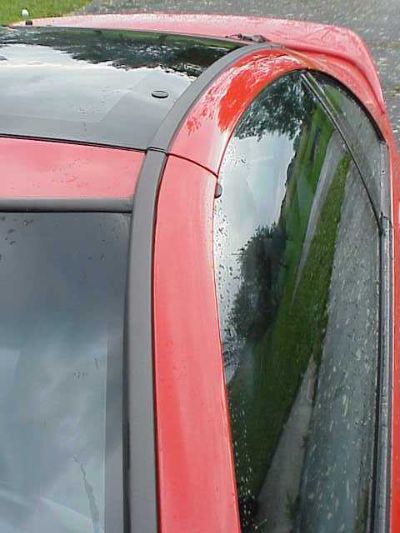
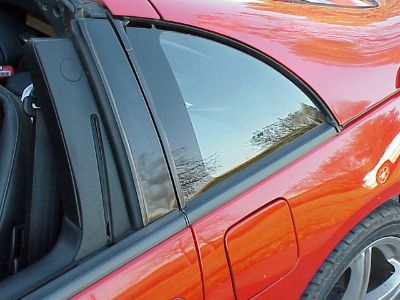
 Side note - the next two pics show the two different kinds of "red" Z's. This is "cherry red pearl." Side note - the next two pics show the two different kinds of "red" Z's. This is "cherry red pearl."
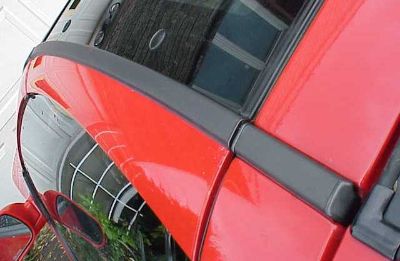
 This is "ultra red." This is "ultra red."
SLICK TOPS
By convention, hard-top Z's without T-tops are called slick tops. I believe all slick tops or hard tops sold in the United States were NA's (normal aspiration = non-turbo) but I am still researching that. Slick-tops are relatively rare.
roof and windshield molding RH 73852-32P00
roof and windshield molding LH 73853-32P00
Slick tops have one long continuous piece of molding that goes along the entire edge of the windshield and across the length of the hardtop roof. No T-top moldings, no separate short little roof moldlings. Slicktops use the same type of molding clips, but use more of them. Buy 10-12 molding clips, part number 73856-30P10.
 Notice the old clips were brittle and falling apart. This piece of molding I was able to remove with my hands only, no pry tools needed. Notice the old clips were brittle and falling apart. This piece of molding I was able to remove with my hands only, no pry tools needed.
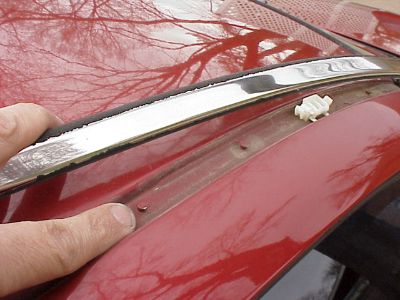 Good example of how the black coating wore off the molding strip. Peeps have tried to remove all the black and re-use the underlying chrome. Good luck with that. Good example of how the black coating wore off the molding strip. Peeps have tried to remove all the black and re-use the underlying chrome. Good luck with that.
 For whatever reason, only the top most clip was black. There was not a separate part number for any black molding clips, as they are otherwise identical to the white clips. For whatever reason, only the top most clip was black. There was not a separate part number for any black molding clips, as they are otherwise identical to the white clips.
My guess was that the black clips were a marker for the clip count on the assembly line.
 Cleaned up the groove and installed new clips. Not every mounting nipple gets a clip. Start at the hatch end and space them out evenly. Cleaned up the groove and installed new clips. Not every mounting nipple gets a clip. Start at the hatch end and space them out evenly.
 A little silicone sealant at this upper windshield corner where the owner said there was a leak. A little silicone sealant at this upper windshield corner where the owner said there was a leak.
There is a little rubber bumper stop on the low end of the windshield moldings (all models). The low end of the molding has to slide under the front fender first and be wiggled into place.
 Make sure the top end of the molding is lined up with the back edge of the roof. Also check the alignment against the top horizontal weatherstrip of the windshield. Make sure the top end of the molding is lined up with the back edge of the roof. Also check the alignment against the top horizontal weatherstrip of the windshield.
Snap the molding into place over each clip. On one side I attached the windshield portion of each long molding before the roof portion, on the other side I did the roof before the windshield. I do not believe the order mattered.
 That is one long continuous piece of molding. Gotta love the slicktops. That is one long continuous piece of molding. Gotta love the slicktops.
DOOR MOLDING
I did my door moldings with the interior door panels off while I was doing some stereo work, but this job does not require the door panels to be removed. I liked the extra margin of safety having the door panels off gave me for not scratching the paint. In case you decide for whatever reason to remove the door panels, there are a couple of excellent links on my Stereo Install page about that.
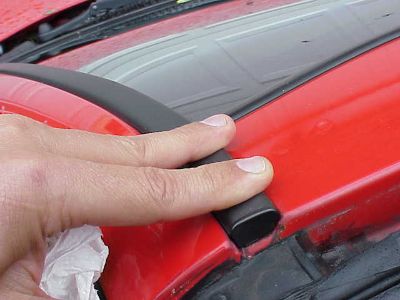
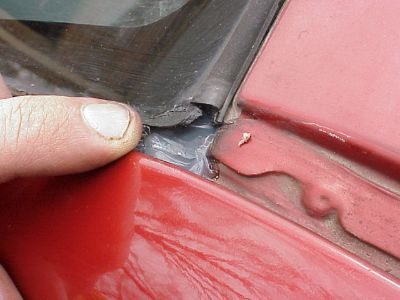
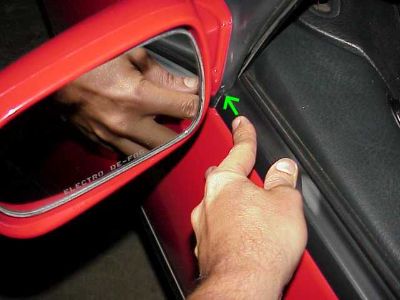
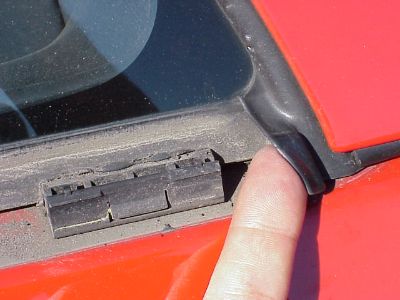
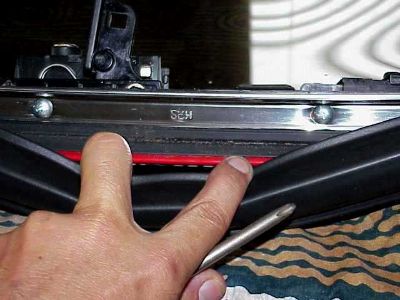
The molding pieces themselves basically just pry off and wedge back on. There is one plastic nipple at the outside base of the door pillar toward the back of the door, that is attached to the molding piece. Pop the molding off of this nipple before you starting prying the whole piece off the door.
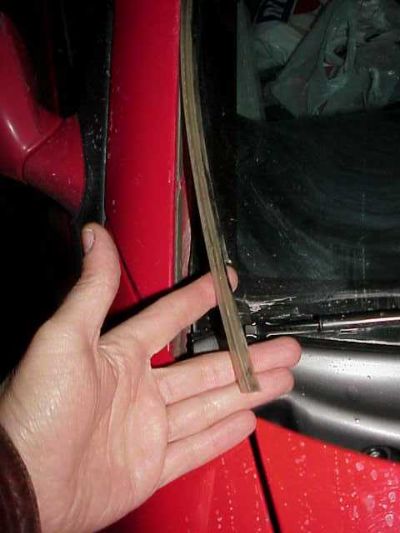
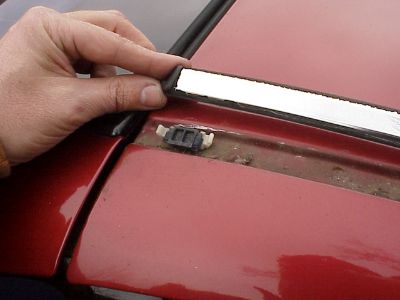
 My finger is crossing the rear door edge and the door is slightly opened. The front of the car is toward the right side of the pic. My finger is crossing the rear door edge and the door is slightly opened. The front of the car is toward the right side of the pic.
Pressure had to be applied from behind this nipple in order to push it into the new molding. But the new molding will stay in place nicely whether or not it is attached to this nipple.
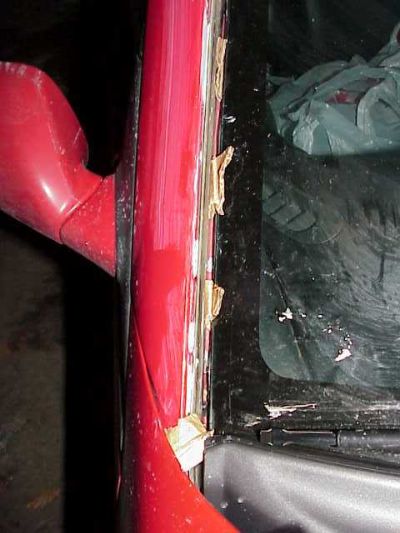
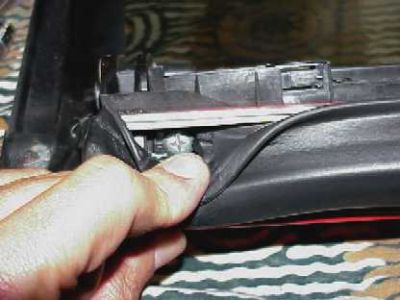
Pry the molding loose from the inside of the door. Don't pry on the glass edge or you can break it.
 My interior door panel is removed, but that is not necessary. My interior door panel is removed, but that is not necessary.
When installing the new piece, first slide the front edge of the molding under the stanchion that holds the side mirrors in place.
 The mirror can be loosened if necessary by taking the interior trim piece off, and loosening the mounting bolt for the mirror. The mirror can be loosened if necessary by taking the interior trim piece off, and loosening the mounting bolt for the mirror.
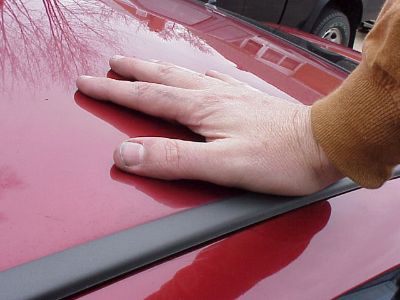
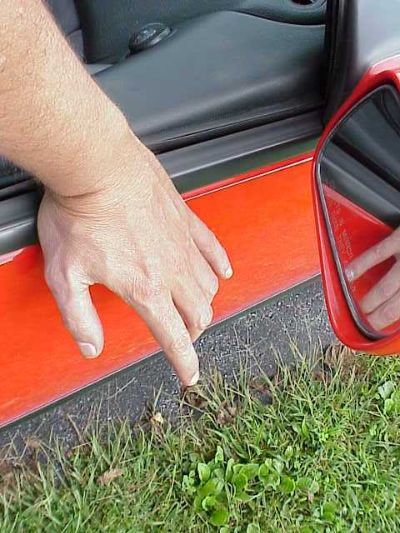
Check the length at the other end, then just press straight down on the molding piece, and inch toward the back of the door. The photo shows me pressing down with the inside door panel already back on. Since you will need to press down pretty hard, I recommend the door be closed so the hinges don’t get stressed. I did not worry about reattaching the plastic nipple piece at the base of the pillar as my molding pieces were plenty tight without it.
REAR SIDE QUARTER WINDOW MOLDING
These are the easiest pieces of molding to remove and install. These pieces can be bought separately from KurumaZ as part of a kit that includes the door molding. Nissan only sells these pieces pre-attached to the rear quarter panel glass, ka-ching$!
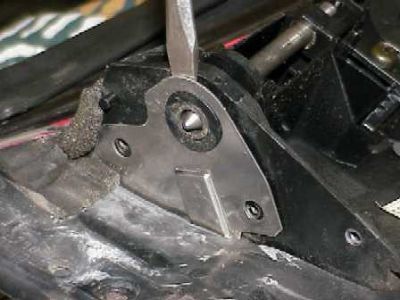
Start by opening the door. Use a screwdriver to gently lift the molding away from the car. Whenever there is a hard tool touching the car body, do it in a place that never shows, duh.
Use a pry tool (ack, I used a screwdriver) to lift the molding just enough so that you can get your fingers underneath the bottom edge. Pull the bottom edge out, and then lift the whole piece up and away. The entire piece should come off easily without breaking anything, especially the three clips underneath.
This piece of rubber window trim below was glued to the rear end of the molding. Be careful not to tear it when removing the old molding. Use a dab of RTV black silicone to stick it back on the new piece of molding after it is installed.
 Lots of grime underneath the molding. Use your favorite paint-safe cleaner on the body and Windex on the glass. Lots of grime underneath the molding. Use your favorite paint-safe cleaner on the body and Windex on the glass.
The three clips under the molding are not hard, rigid plastic, but some kind of firm yet pliable rubber. I have no idea why the middle clip is white since it seemed to be identical to the other two black clips. Probably something to do with the clip count on the assembly line.
 Hook and "hang" the top edge of the channel groove on the back of the molding onto the top of the clips first. Then simply snap the bottom edge of the molding into place. Hook and "hang" the top edge of the channel groove on the back of the molding onto the top of the clips first. Then simply snap the bottom edge of the molding into place.
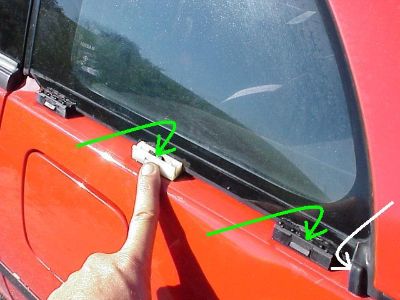
Glue the rubber trim shown by the white arrow onto the molding with a dab of black RTV silicone.
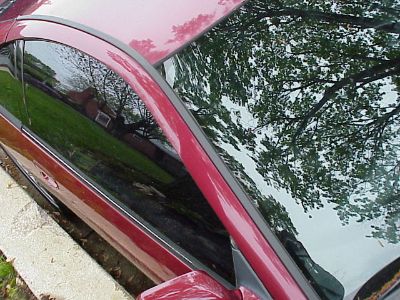
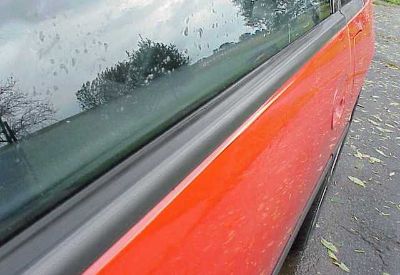
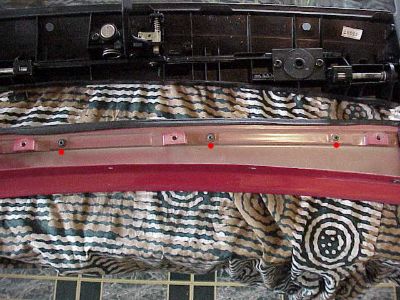
Here is a comparison of the finish on the KurumaZ molding to the right (over the yellow arrow), and new OEM to the left (over the blue arrow). The KurumaZ kit included the door molding, but since my door molding was already new, I didn't need it. The match is excellent, IMHO, but some folks, like the show car crowd perhaps, might feel the slight difference in the finish is a problem. I thought the fit and finish of the KurumaZ pieces were great. The comparison is still worth noting since the remainder of my moldings were all new OEM.

T-TOP MOLDING
Tools needed: Phillips screwdriver, flat screw driver or some other gentle prying tool, 10 mm socket, and some black RTV silicone. I did the whole job without replacing any weather stripping but I re-glued the old stuff back in place.
Basically there are three, large, main, structural pieces to the T-top - the glass, the inside plastic bracket, and the metal exterior body panel to which the molding piece is attached by five screws. Take your T-tops indoors to work on them.
You should disassemble the entire T-top, except for the locking mechanism, to get at the screws that are holding the molding in place. There was a recent, very helpful write-up by “PLEAZURE in CA” that got FAQ'd on how to get to these screws by drilling holes in the plastic bracket. That is an alternative method. I preferred not to drill holes since it is not that much harder to simply take the T-top apart. This also allowed me to refresh and repair the weather stripping that was deeper inside the T-tops with some silicone, which made my T-tops water tight, once again. Plus, I don't like drilling holes in my Z :c)
1) Remove inside shade cover from T-top if you have one, and use the cover as a tray for the screws you remove :c)
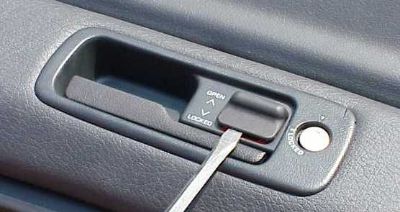
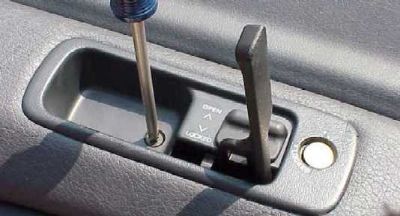
2) Pry off "open < > locked" button. Open handle, remove trim screw. Pry off and remove trim piece around handle. Leave handle open.
3) Remove one screw on each end of garnish cover and pry off garnish cover.
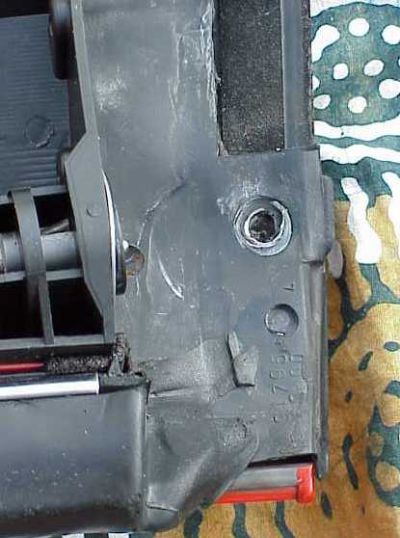
4) Remove five, 10mm nuts/screws holding plastic bracket. Two are flange nuts going through the glass of the T-top, the remaining three are Phillips screw nuts. Their locations are marked on the photo with red dots. Do not undo the screws to the locking mechanism.
5) Remove the two screws attached to the metal end brackets on both ends of the plastic bracket, through which the T-top locking rod extends.
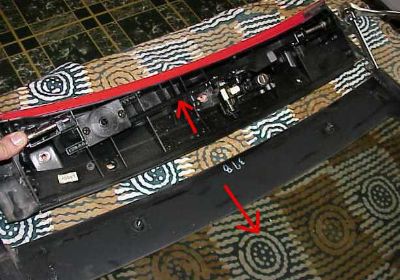
6) Peel back the thick, large black rubber weather stripping, still leaving it attached to its aluminum bracket at the ends. You will see two middle screws, as shown in the photo below.
Remove these two screws. There are also two end screws that pass through the rubber that you access through holes in the rubber. Loosen the two end screws but keep the rubber attached to the aluminum bracket at the ends.
The end screws will sit nicely inside the rubber trim after they are unscrewed from the aluminum bracket. Remove the aluminum bracket from the rest of the T-top. There is a little silicone holding these pieces together, but they should peel apart easily once the four screws holding the aluminum bracket onto the metal exterior piece are removed.
7) Remove one small end screw on each the underside of the T-top. There is some silicone on these screw heads used as a sealer that you should replace when you put everything back together. These screws help connect the glass panel to the T-top bracket AND are the two end screws holding the molding piece to be replaced.
8) Separate the glass from the rest of the T-top by sliding it loose. There is a little bit of glue holding some rubber to the glass at the ends of the plastic bracket, but this is easily pulled loose. Do not lose the T-top bolts that go through the glass as they can fall out since the nuts are already removed.
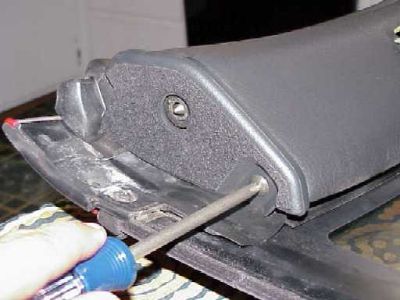
9) Separate the plastic bracket from the metal exterior body piece by gently prying one of the metal brackets on one end free. Once you free one end of the plastic from this metal bracket, you can lift the entire plastic piece away. There is some adhesive weather stripping holding the plastic and metal pieces together. I reused all mine with a little help from some black RTV silicone.
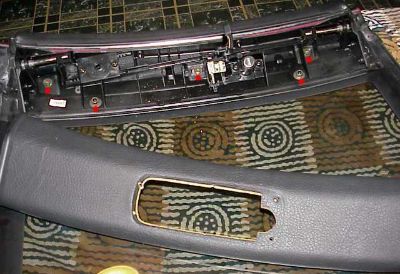
10) You should now have the metal exterior body piece that holds the molding completely free. On the underside of the metal exterior piece, there are three screws left holding the molding in place, shown marked with red dots in the photo. Remove the three remaining screws and the old molding falls off. The channel on the metal exterior holding my molding was pretty grimy so I cleaned it with Simple Green. I also put fresh silicone on the weather stripping seen just above the screws.
11) Install new molding with the three center screws. The end screws don't go in yet.
12) Reverse the above steps and put the whole T-top back together. Slide the plastic bracket back into metal exterior piece that holds the new molding. Replace the four screws in the metal end brackets that secure the ends of the plastic bracket. Slide glass back into metal / plastic piece. Note how the end metal screw holes on the glass piece insert in BETWEEN and underneath the rubber ends of the plastic bracket in the next two photos.

One important step to check at this point is to make sure the glass edge of the T-top is UNDER the molding on the outside. The edge of the molding on the glass side is soft rubber, and it can get turned under and folded back on itself. I used a thin edge to help settle the molding over the glass. Install the two T-top nuts and bolts that go through the glass. Do not over tighten these or you could break the glass :c(
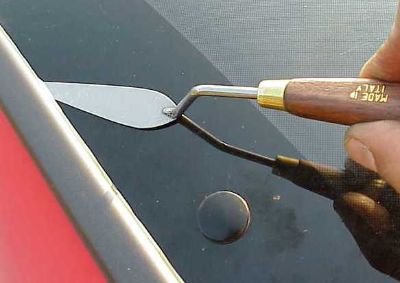
Install the two small end screws that finish attaching the molding. Also, remember that these small screw heads take silicone sealant. Replace the large rubber weather stripping bracket with the four screws. Push the thick, rubber trim back into the groove on its bracket. Replace the three remaining main nuts in the plastic bracket. Replace garnish, its two end screws and trim piece over handle. Pop button back onto sliding lock. I did a final little detail on the soft edge of the molding with one of my favorite precision tools, so that it lay straight and smooth against the glass.
You are done :c)
As an added bonus, after I installed my T-top moldings, my slow, door leak drips went away. My leaks were at the front, top corner of the side window glass. I believe the leaks stopped as a result of mainly tightening all the screws, and refreshing the weather stripping with some silicone, and not because of the new molding itself.
QUICK REPAIR
I tried to park my Z under a sign and it scraped my windshield molding down to the bare shiny metal underneath. This product is what I used for a spot repair. Plasti-kote brand, black Bumper Color, advertises as a low gloss finish, tough flexible acrylic resin, made for use on trim and bumpers.
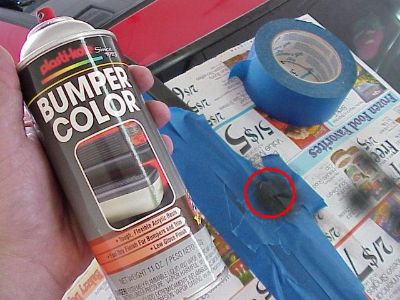 Taped off the gouge and sprayed 5-6 light coats. Taped off the gouge and sprayed 5-6 light coats.
 Not perfect, but also not noticeable to the casual observer. Not perfect, but also not noticeable to the casual observer.
The main reason I include this is that there have been a few motivated individuals who have stripped all the black plastic finish off their old moldings and then repainted them. This product would be a good choice for the repaint.
|