.
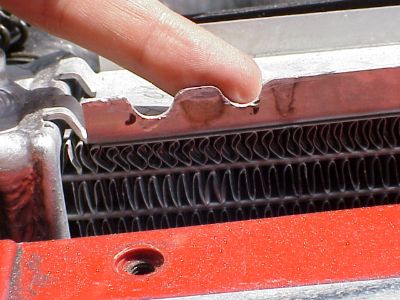
 Hmmm, stock radiator a little less than one inch thick. Hmmm, stock radiator a little less than one inch thick.
 Ahhh, that's better. Z1-Howe radiator is over twice as thick. Ahhh, that's better. Z1-Howe radiator is over twice as thick.
There are two brackets that hold the stock radiator in place from the top. Both brackets have a clip that hold the hood prop bar snug when the hood is closed. Each bracket consists of three pieces when taken apart - the metal bracket, the small white plastic clip that holds the hood prop bar, and the rubber mount. These pieces can be ordered separately if necessary, but you should be able to reuse the stocks ones.
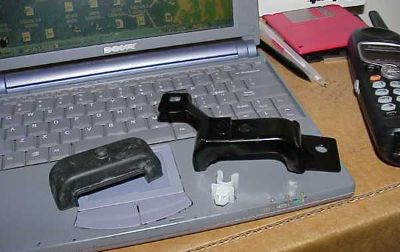
The little white clip sticks in the arm on the metal bracket. The picture shows a passenger bracket. For the OEM radiator, both brackets mount from in front of the radiator, and their arms angle toward the midline of the car. For the Z1 installation, the brackets have to be REVERSED, so the passenger side bracket goes on the driver side, and the driver side bracket is installed on the passenger side. Here are the part numbers, but you really shouldn't need them:
| part no. | description | aprox. price | | 21547-40P00 | passenger side radiator bracket | $12.00 | | 21549-40P00 | driver side radiator bracket | $12.00 | | 21506-40P00 | rubber mounting pad | $3.00 | | 65722-01E00 | white plastic clamp | $2.00 |
The brackets won't fit if you try and put them back on their original sides with the new Howe radiator, so you really can't get them confused.
 Hold the passenger side bracket (originally was the driver side bracket) in place, mark and cut notches as shown with your Dremel or file so the bracket will fit. Hold the passenger side bracket (originally was the driver side bracket) in place, mark and cut notches as shown with your Dremel or file so the bracket will fit.
Some folks would rather notch the brackets than the radiator, but this might weaken the bracket.
The top radiator hose is what keeps the radiator pushed away from the fan and engine. I upgraded my top radiator hose to silicone which is stronger and stiffer, but a stock hose will work fine. Either hose will have to be trimmed to fit since the new radiator is thicker and sits closer to the engine.
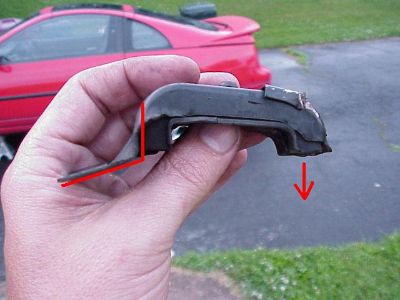 I put a little bend in the mounting bracket as shown by the red angle. This makes the bracket a little more snug against the radiator. I put a little bend in the mounting bracket as shown by the red angle. This makes the bracket a little more snug against the radiator.
The brackets cover the notches so the result is cosmetically acceptable to me, but certainly not to show car standards. You make the call.
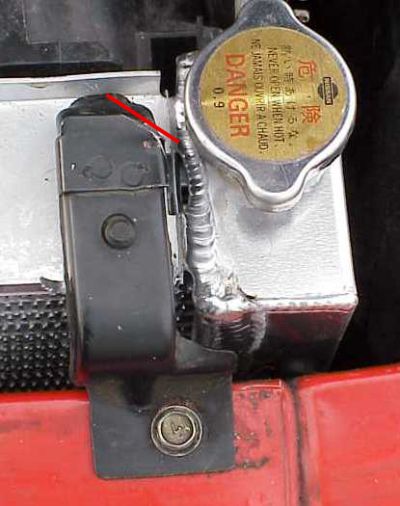 Notch the driver side of the radiator as well. The arm holding the white clip must be cut off or it will run into the radiator cap. The cut is shown by the red line. Save the little plastic clip that was on the arm or order a new one for two bucks. Notch the driver side of the radiator as well. The arm holding the white clip must be cut off or it will run into the radiator cap. The cut is shown by the red line. Save the little plastic clip that was on the arm or order a new one for two bucks.
I still wanted to use two clamps to hold down my hood strut bar, not just the one left on the passenger side. I decided to mount a second plastic clamp on the radiator shroud. I marked the shroud where I wanted to put the clip based on how the hood strut bar lay. Then I Dremel'd the right size and shape hole using one of the radiator brackets as a template. Make the hole a little on the small side since the fan shroud is made of plastic, and not rigid metal like the bracket.
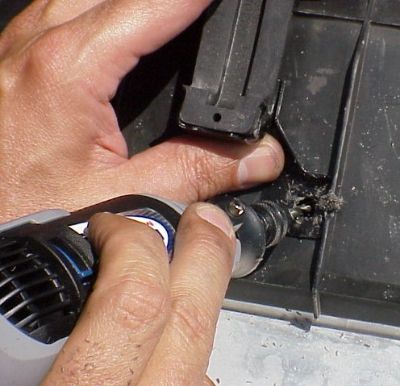 I'm holding one of the radiator brackets in place so I can use it as a template to cut the right size hole in the top of the fan shroud for the plastic clamp. I'm holding one of the radiator brackets in place so I can use it as a template to cut the right size hole in the top of the fan shroud for the plastic clamp.
 After I cut the hole, I ground down the ridges in the fan shroud to make a channel for the strut bar. After I cut the hole, I ground down the ridges in the fan shroud to make a channel for the strut bar.
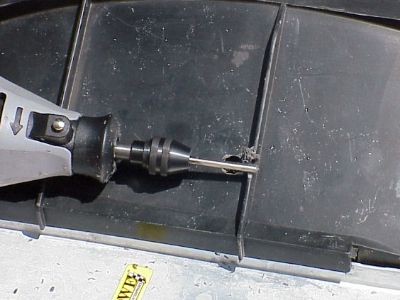
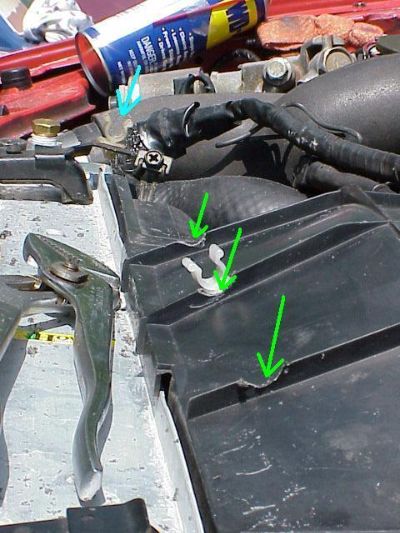 The green arrows show the ridges ground down for the strut bar channel. The new plastic clip is next to the middle green arrow. The blue arrow points to the strut clamp on the passenger side radiator bracket. The green arrows show the ridges ground down for the strut bar channel. The new plastic clip is next to the middle green arrow. The blue arrow points to the strut clamp on the passenger side radiator bracket.
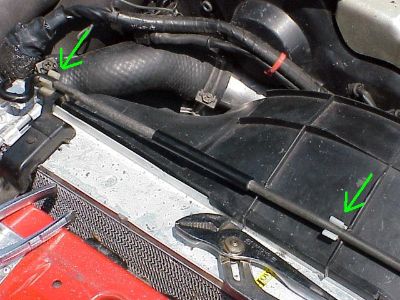 The strut bar fits nice and snug. I had to bend the bar several different times to get it to rest in place without any tension on the clips. The fan shroud is plenty strong enough for this purpose. Don't be afraid to use a touch of glue on the shroud clip, but I didn't need any. The strut bar fits nice and snug. I had to bend the bar several different times to get it to rest in place without any tension on the clips. The fan shroud is plenty strong enough for this purpose. Don't be afraid to use a touch of glue on the shroud clip, but I didn't need any.
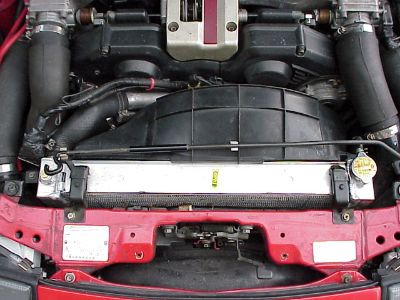 The finished install. Thanks to Larry at UAS for helping. The finished install. Thanks to Larry at UAS for helping.
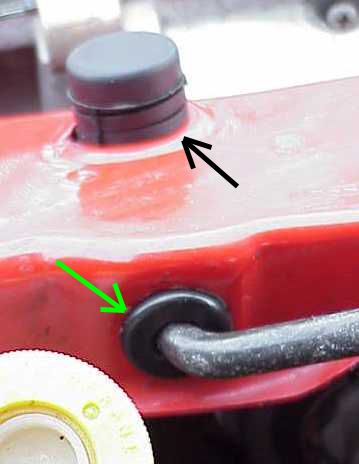 Finishing touches - you may notice, as I did, that the grommet shown by the green arrow at the base of the hood prop bar was crumbly, broken, or gone all together. Finishing touches - you may notice, as I did, that the grommet shown by the green arrow at the base of the hood prop bar was crumbly, broken, or gone all together.
I replaced the grommet so the bar wouldn't rattle. The trick for getting the pry bar in and out is to wiggle it straight, parallel to and nearly resting on the driver fender, then flip it upside down. Reverse to install. The black arrow shows a new hood bumper stop. I recommend changing the bumper stops on both sides if they are still original.
| part no. | description | aprox. price | | 65722-30P10 | grommet for hood prop bar | $3.00 | | 65822-01M00 | hood bumper stop | $6.00 |
Here's a photo of the difference between the new and old hood bumper stops.
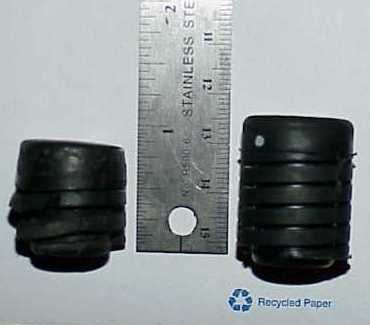 Not only was there a noticeable height difference, but the new ones fit much more snug. Not only was there a noticeable height difference, but the new ones fit much more snug.

I lived with the above radiator installation for years without any issue. However, in the back of my mind was always the thought that my reuse of the original radiator brackets did a good job of holding the radiator down, but did not add much strength in keeping the radiator from sliding backwards toward the engine.
This problem never surfaced because my silicone upper radiator hose put pressure on the radiator from behind. But that hose was never intended to be a structural component for mounting the radiator. So when I upgraded my turbos I decided it was time to beef up the radiator mounts with a new aftermarket bracket.
David at MegaZ runs a small one-man shop that makes a lot of these parts to order.
|