| | 
My second try on doing this, and it still isn't perfect, but I'm getting close. Getting the rear panel perfectly black and smooth, without the "300ZX" logo is not as easy at it sounds. This turned out to be a fairly typical Z project since it was three times as expensive and took four times as long as I thought it would take, lol. The problem is that the logo is raised plastic on the reverse side of the panel, so even after sanding and painting it from the inside you can still see the symbols because they are molded into the plastic. Just sanding them down is not that easy, since if the panel gets scratched or marred at all on the inside, the scratches show through plain as day on the visible side.
I used the excellent FAQ from TT.net on "How do I make the 300ZX on the rear panel glow?" as my guide. This is essentially the same process except instead of making the logo glow, I am trying to eliminate it. From the FAQ, note that the four brads along the top edge of the panel are threaded. Turning them CCW helps in their removal. The brads can also be pried out with a pen knife.
I would also recommend setting the oven a little cooler, to about 300-350 degrees and taking your time. That will minimize any curling of the edges on the softer, plastic backing that houses the lights. Don't hesitate to work the panel a few times to and from the oven.
Since they logo is raised, I found that scraping with the flat edge of a pocket knife was much faster and cleaner than sanding.
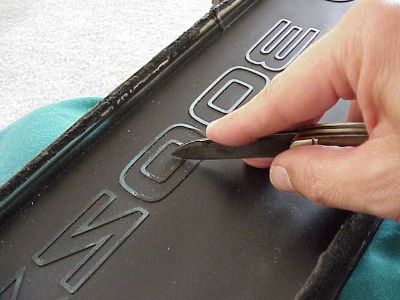 TAKE YOUR TIME. Scraping the paint off takes over an hour. Take extra care not to knick or scratch the surrounding flat panel. TAKE YOUR TIME. Scraping the paint off takes over an hour. Take extra care not to knick or scratch the surrounding flat panel.
Removing scratches that you caused is much harder than taking your time to not scratch the panel in the first place.
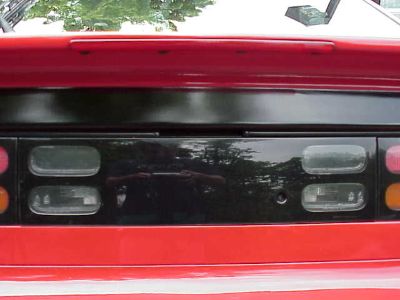
With the paint off the raised symbols, the plastic is clear and transparent. Hold the panel up to the light every now and then as you work and you will be able to see every little paint speck you are trying to remove. You must remove every last, small fleck of the original logo paint, otherwise it will be very noticeable once you start covering it with the black paint, and then it's too late to go back unless you start over. The pic shows the panel from the inside, with the black paint scraped OFF, and just a little scraping left to do on the middle zero. You are scraping two coats of paint off. The gray color of the logo was under the black topcoat. I sanded the logo lightly after the paint was off.
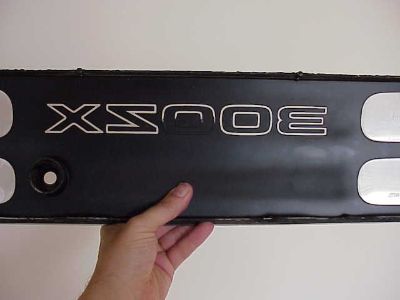
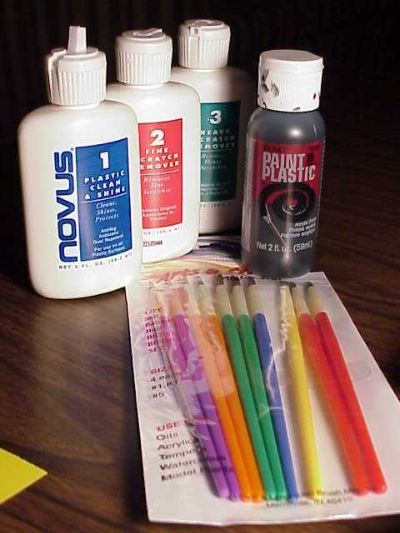
The type of paint used was a huge issue. For some strange reason, paint does not want to adhere to the bare plastic on the logo. I tried three different kinds of black spray paint and they either wouldn't stick, or they would start to "crackle" after repeated coats. The black paint I ended up using that worked was called "Plaid Paint For Plastic." I bought it at a Michael's, an arts and crafts mega-store chain. The paint was very thick and goopy. I prepped the plastic with alcohol as per the instructions on the paint bottle. I applied five or six coats with a small brush before the paint was opaque enough. The paint was a water-soluble acrylic and cost $2. A pack of cheap brushes was $1. The pic also shows the Novus system I used for three step removal of scratches on the outside surface of the panel, which I recommend.
The paint on the back of the panel doesn't have to be pitch black. In fact, after you take the panel apart, you will notice that light does bleed through parts of it. Once the panel is sealed with its black plastic backing piece, no light can enter from behind and the front will look black even if there are a few small bare spots from the paint.
When squishing the panels back together, I heated the oven to 300 degrees and just used my hands for about three or four cycles of heating and squeezing. The results were excellent and there was no need for clamps. The only part you can burn yourself on are the metal studs that stick out the back. The plastic you can handle and squeeze while it cools over a minute or so.
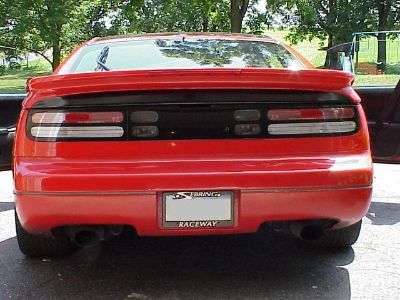
Once on the car, where it counts, the panel looks solid black as shown in the pictures, especially after a few minutes of road grime, lol. That is my reflection in the panel, and my Kaminari 60 LED spoiler above the panel. I also left the decals and emblems off of the spoiler.
The panel is much more "stealthy" than before, and I am happy with it. There are no longer any decals or emblems on my car's body. This was the "badgeless" look I was going for. The "300ZX" on the rear panel was the hardest part to remove. My friend Lou from Manhattan also owns a TT. He says they call it "sleeper" style in The City :c)
 Another big change in this pic is the JDM taillights. Another big change in this pic is the JDM taillights.
| |