Replacing original parts on an old sports car is justified based on the age of the vehicle in the name of preventive maintenance. More truthfully, I had wondered if my slightly sticky first gear could be improved with a new clutch master cylinder (CMC or just MC), having already replaced the slave cylinder. Since I did not have any leaks or a mushy clutch pedal I may have been a little premature in changing out the CMC.
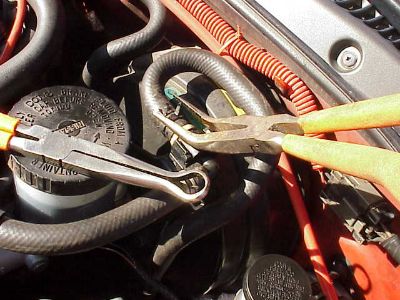
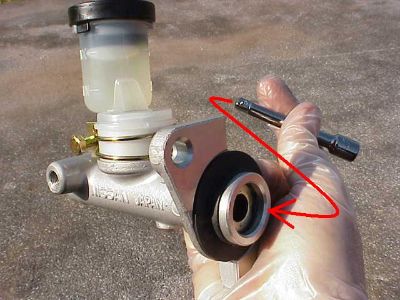
The reservoir for clutch master cylinder is shown in middle of pic below. Disconnect one end of each of the clutch vacuum assist hoses with the yellow dots on them and pivot them out of the way. This will allow enough room for a socket wrench to barely turn on the two MC mounting bolts on the firewall. Normal to get a hiss when disconnecting the first vacuum hose.
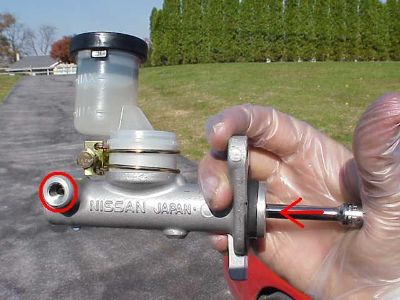
 Yellow arrow in right lower corner points to the hard line that attaches to clutch MC, hidden by the hose laying on top of it. Break the hard line loose a half turn or so with a 10 mm flare nut wrench. Yellow arrow in right lower corner points to the hard line that attaches to clutch MC, hidden by the hose laying on top of it. Break the hard line loose a half turn or so with a 10 mm flare nut wrench.
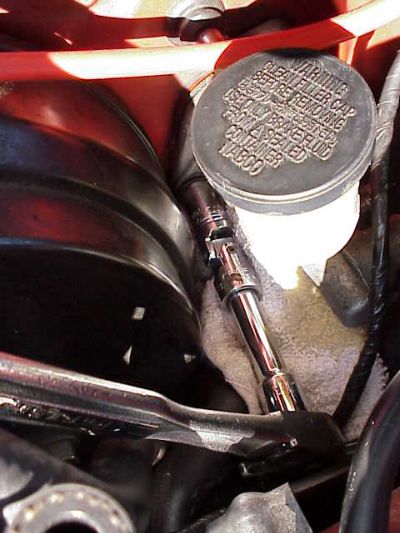
Do not fully disconnect the hardline from the master cylinder yet or it will leak all over. Brake fluid will eat the paint finish off a car, so be careful.
 These curved long needle nose pliers and hose pliers. come in very handy when working on a Z. These hoses are easy to access, many others are not. These curved long needle nose pliers and hose pliers. come in very handy when working on a Z. These hoses are easy to access, many others are not.
 With the hoses out of the way, unbolt the two 12 mm flange bolts that mount the MC to the firewall. The top one is easy. Stuff a rag underneath to catch drips AND this lower mounting bolt, which is fairly hard to access. I could not get my fingers on this nut. With the hoses out of the way, unbolt the two 12 mm flange bolts that mount the MC to the firewall. The top one is easy. Stuff a rag underneath to catch drips AND this lower mounting bolt, which is fairly hard to access. I could not get my fingers on this nut.
Without the rag, the nut may fall into the crevices of the car and never be seen again. Use a short extension and swivel attachment as shown above. After the two mounting bolts are freed, finish disconnecting the hard line and lift out the MC.
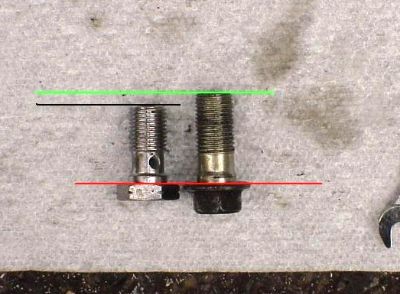
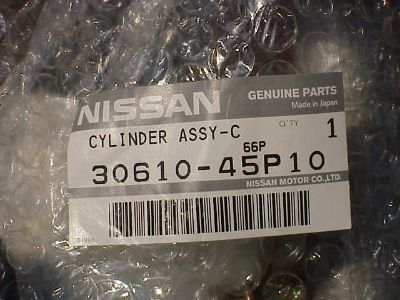 Part number for my '92 TT clutch MC. The part number is different for the '90-'91 models. The '92-'96 MC reportedly has a larger piston and will bolt up to the earlier model years. Part number for my '92 TT clutch MC. The part number is different for the '90-'91 models. The '92-'96 MC reportedly has a larger piston and will bolt up to the earlier model years.
Using the later model MC for the earlier Z's takes advantage of the greater pressure generated by the larger piston. The fluid reservoir sits closer to the firewall on the '92-'96' MC's. This crowds one of of the clutch booster vacuum hoses on the '90-'91 Z's. So for '90-'91 Z's, the hose should also be changed out for a '92-'96 hose. Take a look at the first pic on this page to see the hose with the yellow dot that is snaking around the MC.
The clutch system uses brake fluid. Fill reservoir of the new MC and put on cap. There will be some drip leakage. Don't get any brake fluid on your paint.
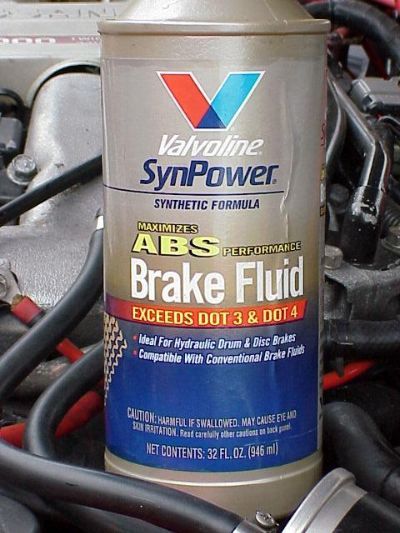 This is what I use for my clutches. Readily available at auto parts stores. Clutch system is low pressure compared to brake lines. All the hard parts move when the clutch pedal is depressed. Compare this to brake lines where pressure is being built up against immovable objects - pads against rotors. This is what I use for my clutches. Readily available at auto parts stores. Clutch system is low pressure compared to brake lines. All the hard parts move when the clutch pedal is depressed. Compare this to brake lines where pressure is being built up against immovable objects - pads against rotors.
This fluid gives me the benefits of synthetic without overkill, but is still a step up from the generic DOT-3 stuff that is found on all the store shelves. I use higher end Super Blue fluid for the brakes.
 Ghetto bench bleed using 1/4" short ratchet extension or some other similarly blunt instrument. Ghetto bench bleed using 1/4" short ratchet extension or some other similarly blunt instrument.
 Brake fluid will squirt out at the hole cirlced in red and prob some air will suck back in but this is better than no bleed at all, IMO. I bled the stink out of my clutch lines afterwards. Brake fluid will squirt out at the hole cirlced in red and prob some air will suck back in but this is better than no bleed at all, IMO. I bled the stink out of my clutch lines afterwards.
Preferred method is to have clear plastic tubing rigged so the fluid that squirts out the hole feeds back into the reservoir. Here is a proper example of a bench bleed using a z32 brake MC.
Stick the MC back onto the mounting studs. Hand thread the hardline back into place. Don't cross thread it.
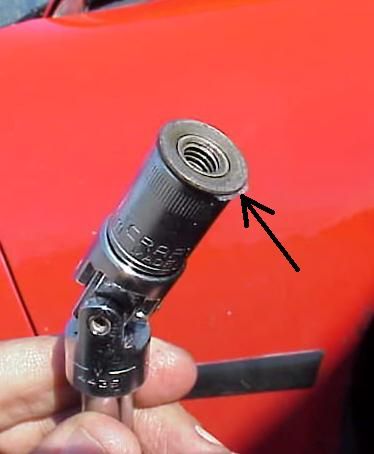 Arrow shows dab of silicone holding 12 mm flange nut into the socket. Let the silicone get tacky for a few minutes before sticking the nut into the socket. Thread nut onto lower MC mounting stud using a short straight extension and a swivel attachment. Easier to turn the extension without the handle at first. Arrow shows dab of silicone holding 12 mm flange nut into the socket. Let the silicone get tacky for a few minutes before sticking the nut into the socket. Thread nut onto lower MC mounting stud using a short straight extension and a swivel attachment. Easier to turn the extension without the handle at first.
Finish tightening the mounting bolts with the ratchet, then go back and tighten the hard line with a 10 mm flare nut wrench.
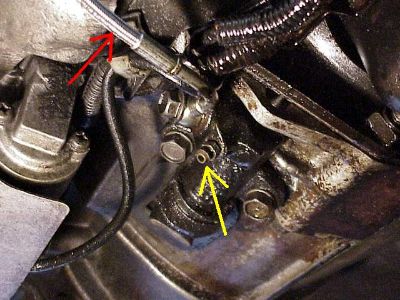 Bleed nipple on slave cylinder under car, right side of tranny. Red arrow pointing to my old stainless steel clutch line. Bleed nipple on slave cylinder under car, right side of tranny. Red arrow pointing to my old stainless steel clutch line.
 Second bleed point for clutch under hood circled in yellow, passenger side near front. There is a flare nut wrench on the bleeder. Second bleed point for clutch under hood circled in yellow, passenger side near front. There is a flare nut wrench on the bleeder.
Yellow arrows point to 3/16" plastic tubing slipped over bleed nipple and run outside of car, to keep things neat.
Don't get any brake fluid on your paint. The other end of the plastic tubing went into a perfectly clean empty clear glass bottle. Start the bleed with the free end of the hose in the bottle, and submerged under an inch or so of new brake fluid. That way, no air can get sucked back into the clutch lines.
IMHO, when peeps have trouble bleeding their clutches or brake lines, ninety-nine percent of the time it is operator error and poor technique. I don't use speedbleeders or vacuum pumps. I always use a second person to pump the pedal. Coordinating the pedal movements with the proper time to open and close the bleeder nuts is the key. Peeps who can't get air out of their lines are typically introducing air into their lines during the bleeding process. I've never had any issues of air getting "stuck" in the lines.

I was doing a little bit of stupid street racing against a Ninja when I suddenly lost all clutch pressure. I managed to limp home in second gear.
Checked my clutch MC reservoir under the hood - low on fluid. Did not find the source of the leak until I had a friend press the clutch pedal while I was looking at the slave cylinder under the car. Then I got squirted in the eye with clutch fluid coming from a hole in my (supposedly bulletproof) stainless steel clutch line.
 Red arrow shows failure point of old clutch line. Green arrow points to a collar nut that does not exist on the new, replacement SST clutch line. Red arrow shows failure point of old clutch line. Green arrow points to a collar nut that does not exist on the new, replacement SST clutch line.
There were less moving parts on the new line, but flex and position adjustment on the line is now done at the upstream connection of the line.
The hanging line is the new SS clutch line. Using my expert mechanical ability (sarcacsm) I managed to round off the nut at the red arrow. The way to avoid that is to use the proper tool - a flare nut wrench. I didn't have one then, I do now.
There is a clip that goes on the clutch line next to the arrow, that has already been removed.
 I bought a new hardline to replace the rounded off nut on the hardline above. part # 30851-37P00. I bought a new hardline to replace the rounded off nut on the hardline above. part # 30851-37P00.
 The new replacement banjo bolt that came with the SS clutch line is on the left, and was a little shorter than the stock bolt. The new replacement banjo bolt that came with the SS clutch line is on the left, and was a little shorter than the stock bolt.
I had heard that some folks had issues getting the new banjo bolt to thread, so I didn't even try. I reused the old banjo bolt AND the brass washers.
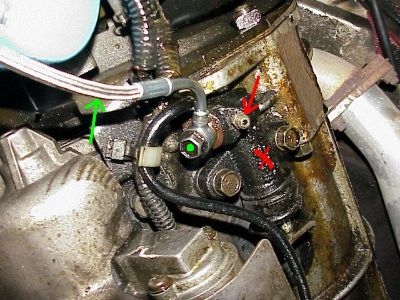 Green dot is the banjo bolt, green arrow the new SS clutch line, red arrow bleed nipple, red X the slave cylinder. Everything was wet from clutch fluid after the line blew. Green dot is the banjo bolt, green arrow the new SS clutch line, red arrow bleed nipple, red X the slave cylinder. Everything was wet from clutch fluid after the line blew.
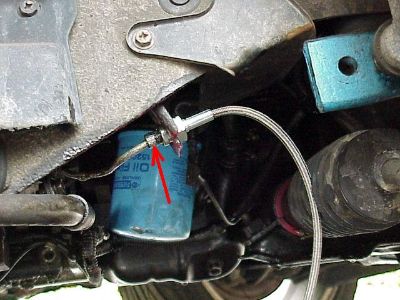
 Close-up of bleeder under hood for clutch. I had to pad the screw head to keep it from banging the underside of the hood. Close-up of bleeder under hood for clutch. I had to pad the screw head to keep it from banging the underside of the hood.
A couple of years later, I decided to delete this upper clutch bleeder and tubing.

Eliminating the large upper bleeder line means a lot less fluid to compress, a more direct shot to the slave cylinder, better clutch response, better feel, and less sponginess. Also, it should be easier to adjust the clutch and definitely easier to bleed the system with one bleeding point instead of two. This would also take better advantage of the stiffness from my stainless steel clutch line.
Plus the upper bleeder was rubbing the underside of my hood and making noise. I felt I had more than enough reasons to attempt this mod, which should be easily reversible in case of any unwanted surprises. I saved my old parts.
I ordered part number UM16-3 brake fitting from FedHill. This small piece was described as a 10 X 1 mm SAE double flare female union fitting. Fed Hill was fast and helpful in answering my E-mail inquiry.
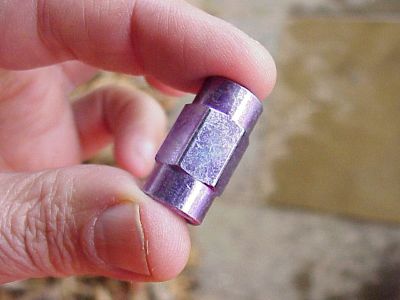 part number UM16-3 part number UM16-3
I have been told but not confirmed that these are the part numbers for the same type of piece from different manufacturers. One guy wrote that he walked up to the NAPA counter and bought one:
- Edelman - 274000
- Everco - 30068
- Weatherhead - 7934A
The line circled in white is the much larger upper clutch bleed line. The junction or "damper" box will also be eliminated. We considered just capping the junction box at the white circle with some sort of plug, but my sources were concerned that the box might trap an air bubble, so better to get rid of it altogether.
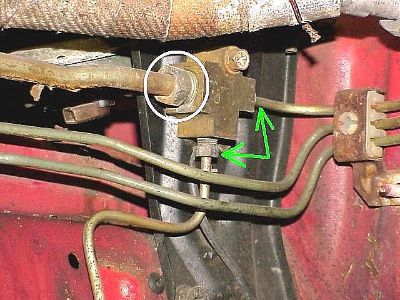 Here is the junction box, near the firewall in the passenger corner. The engine is out but that is not necessary to do this delete. The two lines at the green arrows need to be joined. Here is the junction box, near the firewall in the passenger corner. The engine is out but that is not necessary to do this delete. The two lines at the green arrows need to be joined.
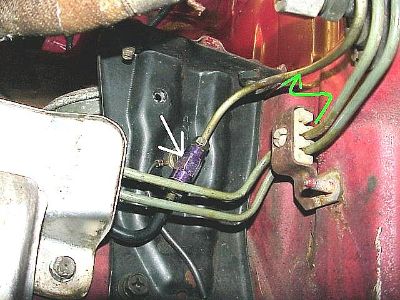 Junction box eliminated, union fitting in place. The lines were gently bent about 45 degrees until they were close enough to attach to each other. Junction box eliminated, union fitting in place. The lines were gently bent about 45 degrees until they were close enough to attach to each other.
Notice that the upper cluch line had to be removed from the bracket to make the bend, as shown by the green arrow above.
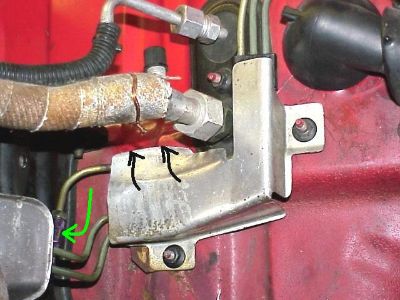 There is a stock heat shield that bolts over the lines. The edge of the heat shield was bent upwards at the black arrows such that it would still cover all three lines. There is a stock heat shield that bolts over the lines. The edge of the heat shield was bent upwards at the black arrows such that it would still cover all three lines.
The new purple union fitting can be partially seen near the green arrow above.
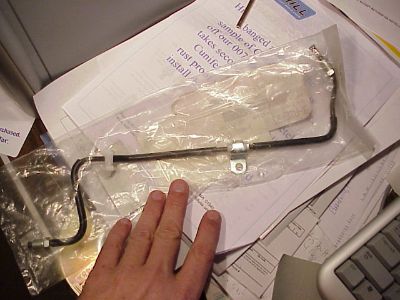
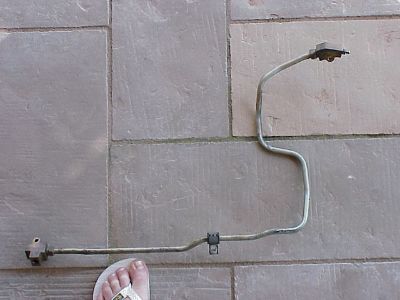 This pic shows the deleted upper bleeder that I saved in case I wanted to reverse this mod. This pic shows the deleted upper bleeder that I saved in case I wanted to reverse this mod.
This mod was put into use May, 2008, at the same time as my new Southbend Feramic clutch. Ran it that way for years, no issues to report, clutch feel was great.
|